How to Disable/Enable Your Laptop's Camera in Windows 10
In today’s video, I’m going to show you how to disable your laptop’s camera (webcam) in Windows 10.
To get started:
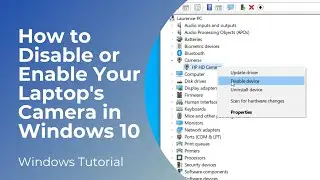
1. Go into the Windows start bar, and type in “Device Manager”.
2. Click on the “Device Manager” search result.
3. When the device manager opens up, click on the arrow next to the “Cameras” menu item.
4. Now right click on your laptop’s camera, in my instance it’s the “HP HD Camera”.
5. From the context menu, click on the “Disable device” menu option.
6. Select “Yes” on the dialog window.
7. Your camera will now be disabled, if we open up the camera application on Windows, you’ll see that a camera cannot be found.
8. If you decide to re-enable your laptop’s camera, simply repeat the process, but select the “Enable device” option when right clicking on the camera.
#techsupport #webcam #camera #devicemanager #windows10
Watch video How to Disable/Enable Your Laptop's Camera in Windows 10 online, duration hours minute second in high quality that is uploaded to the channel Laurence Tindall 09 September 2024. Share the link to the video on social media so that your subscribers and friends will also watch this video. This video clip has been viewed 10,893 times and liked it 32 visitors.