Cisco CCNA Packet Tracer Ultimate labs: RIP routing lab: Can you complete the lab?
Packet Tracer file (PT Version 7.1): https://bit.ly/2IvWY5y
Get the Packet Tracer course for only $10 by clicking here: https://goo.gl/vikgKN
Get my ICND1 and ICND2 courses for $10 here: https://goo.gl/XR1xm9 (you will get ICND2 as a free bonus when you buy the ICND1 course).
For lots more content, visit http://www.davidbombal.com - learn about GNS3, CCNA, Packet Tracer, Python, Ansible and much, much more.
#CCNA #PacketTracer #CCENT
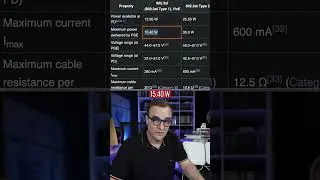
The Routing Information Protocol (RIP) is one of the oldest distance-vector routing protocols which employ the hop count as a routing metric. RIP prevents routing loops by implementing a limit on the number of hops allowed in a path from source to destination. The largest number of hops allowed for RIP is 15, which limits the size of networks that RIP can support.
RIP implements the split horizon, route poisoning and holddown mechanisms to prevent incorrect routing information from being propagated.
In RIPv1 router broadcast updates with their routing table every 30 seconds. In the early deployments, routing tables were small enough that the traffic was not significant. As networks grew in size, however, it became evident there could be a massive traffic burst every 30 seconds, even if the routers had been initialized at random times.
In most networking environments, RIP is not the preferred choice for routing as its time to converge and scalability are poor compared to EIGRP, OSPF, or IS-IS. However, it is easy to configure, because RIP does not require any parameters unlike other protocols.
RIP uses the User Datagram Protocol (UDP) as its transport protocol, and is assigned the reserved port number 520
Based on the Bellman–Ford algorithm and the Ford–Fulkerson algorithm distant-vector routing protocols started to be implemented from 1969 onwards in data networks such as the ARPANET and CYCLADES. The predecessor of RIP was the Gateway Information Protocol (GWINFO) which was developed by Xerox in the mid-1970s to route its experimental network. As part of the Xerox Network Systems (XNS) protocol suite GWINFO transformed into the XNS Routing Information Protocol. This XNS RIP in turn became the basis for early routing protocols, such as Novell's IPX RIP, AppleTalk's Routing Table Maintenance Protocol (RTMP), and the IP RIP. The 1982 Berkley Software Distribution of the UNIX operating system implemented RIP in the routed daemon. The 4.2BSD release proved popular and became the basis for subsequent UNIX versions, which implemented RIP in the routed or gated daemon. Ultimately RIP had been extensively deployed before the standard written by Charles Hedrick was passed as RIPv1 in 1988.
Transcription:
In this packet tracer lab, you need to configure Routing Information Protocol or RIP version 2 to enable connectivity between sites in this network. This lab consists of required tasks and bonus tasks. In the required tasks section, you need to configure a RIP version 2 to enable connectivity between sites and verify that the router can ping each other’s loopback interfaces.
In this topology, we have 3 sites: site 1, site 2 and site 3 which are connected via an Internet router, so router 1 at site 1 is connected via serial link to the Internet facing router. So is router 2 and so is router 3.
Each router has physical interfaces configured as well as loopback interfaces.
So as an example, on router 1, show ip interface brief
shows us that the router has this IP address configured on gigabit 0/0/0.
So that should be gigabit 0/0/0. It has this IP address configured on the serial interface and this IP address configured on the loopback interface.
You need to make sure that there’s IP connectivity between the various devices in the network. You firstly need to ensure that the routers can ping each other’s loopbacks.
At the moment, router 1 only displays connected and local routes in the routing table.
On router 2, as an example, we don’t see the loopback of router 1 in the routing table.
So if router 2 tries to ping router 1’s loopback interface, the pings are going to fail because the router doesn’t know where to forward the traffic. You need to enable RIP on the routers and ensure that there’s IP connectivity between the loopbacks in the first part of this lab.
Now there are additional bonus tasks.
Once you’ve completed the required tasks, advertise default route on the Internet router to other routers via RIP. So within the RIP process on the Internet router, advertise a default route so that these routers can access devices on the Internet.
Create DHCP pools on the routers, so on router 1, router 2 and router 3 to allocate IP addresses to PCs in the relevant subnets. Create a default route on the switches.
So as an example on switch 1, this switch currently has no routes in the routing table, no default gateway is configured. ...
Смотрите видео Cisco CCNA Packet Tracer Ultimate labs: RIP routing lab: Can you complete the lab? онлайн, длительностью часов минут секунд в хорошем качестве, которое загружено на канал David Bombal 18 Май 2018. Делитесь ссылкой на видео в социальных сетях, чтобы ваши подписчики и друзья так же посмотрели это видео. Данный видеоклип посмотрели 1,727 раз и оно понравилось 36 посетителям.