FreePBX VoIP Tutorial Part 11 - Setting up multiple Google Voice phones
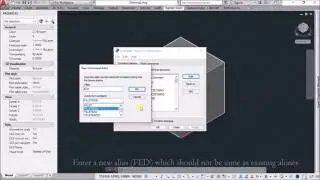
Note: Slight correction. At 1:07 in the video, you want to set NAT to YES.
Command used in PuTTY: asterisk -rvvv
To leave the Asterisk CLI after typing the above command, simply type exit and hit enter. It will go back to the root@pbx command prompt.
Part 1 - Introduction - • FreePBX VoIP Tutorial Part 1 - Introd...
Part 2 - Gmail and Google Voice Setup - • FreePBX VoIP Tutorial Part 2 - Gmail ...
Part 3 - VirtualBox and PBX in a Flash - • FreePBX VoIP Tutorial Part 3 - Virtua...
Part 4 - DDNS - Free Static IP Setup - • FreePBX VoIP Tutorial Part 4 - DDNS -...
Part 5 - Router Settings - • FreePBX VoIP Tutorial Part 5 - Router...
Part 6 - Configuring FreePBX - • FreePBX VoIP Tutorial Part 6 - Config...
Part 7 - Configuring Google Voice - • FreePBX VoIP Tutorial Part 7 - Config...
Part 8 - Configuring CSipSimple for your first call - • FreePBX VoIP Tutorial Part 8 - Config...
Part 9 - Installing codecs - G.729 - • FreePBX VoIP Tutorial Part 9 - Instal...
Part 10 - Module updates + Backup & Restore - • FreePBX VoIP Tutorial Part 10 - Modul...
Part 11 - Setting up multiple Google Voice phones - • FreePBX VoIP Tutorial Part 11 - Setti...
Part 12 - Now what? Get a free phone number with IPKALL + Hold Music - • FreePBX VoIP Tutorial Part 12 - Now w...
Watch video FreePBX VoIP Tutorial Part 11 - Setting up multiple Google Voice phones online, duration hours minute second in high quality that is uploaded to the channel nirvgorilla 12 May 2013. Share the link to the video on social media so that your subscribers and friends will also watch this video. This video clip has been viewed 9,552 times and liked it 27 visitors.